Short direct answer
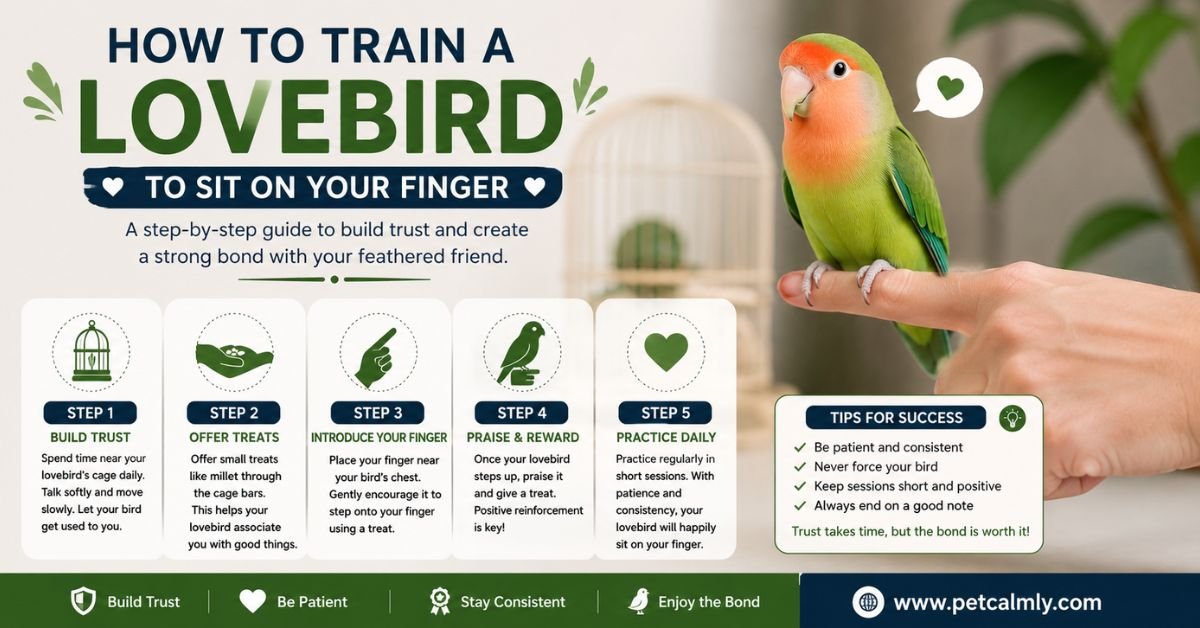
Training a lovebird to sit on your finger is all about building trust, using gentle repetition, and rewarding calm behavior. Start by getting your bird comfortable with your presence, then slowly introduce your hand near its perch without forcing contact. Use a calm voice and offer small treats when it shows curiosity or steps closer. Once it stops fearing your hand, gently present your finger at chest level and encourage a “step up” motion. The key is patience never rush or grab the bird, or you may damage trust and slow progress significantly.
How to Train a Lovebird to Sit on Your Finger (Complete Beginner-Friendly Guide)
Training a lovebird to step onto your finger is one of those small milestones that feels surprisingly emotional for bird owners. It’s not just a trick—it’s trust. Many first-time bird keepers feel nervous because lovebirds are energetic, intelligent, and sometimes a little stubborn.
But here’s the reassuring truth: most lovebirds can learn finger training within days to a few weeks if the process is calm and consistent.
This guide walks you through everything step-by-step, including what your bird is feeling, common mistakes to avoid, and how to build a bond that lasts.
Understanding Your Lovebird’s Behavior First
Before training starts, it helps to understand what’s going on in your bird’s mind.
Lovebirds are naturally:
- Social but cautious
- Highly bonded to familiar environments
- Sensitive to sudden movement
- Quick learners when relaxed
In the wild, these small parrots rely heavily on trust within their flock. Your hand is essentially “a new object” in their world. If introduced too quickly, it can feel like a threat rather than an invitation.
Why your lovebird might avoid your hand
- Fear of being grabbed
- Lack of hand exposure
- Previous negative handling experiences
- Stress or environmental changes
- Overstimulation (noise, movement, other pets)
Once you see behavior through this lens, training becomes less about control and more about communication.
Building Trust Before Any Training Begins
This step is where many owners rush and then struggle later.
You cannot skip trust-building.
Simple trust-building routine (3–5 days minimum)
Spend time near your bird without forcing interaction:
- Sit beside the cage quietly for 10–15 minutes
- Talk softly or read aloud
- Avoid direct staring (birds interpret this as pressure)
- Move slowly around the cage
- Offer treats through the bars
Good treats for lovebirds include:
- Millet spray (very effective)
- Small fruit pieces (apple, grape—tiny amounts)
- Seed mix favorites
The goal is simple:
“My human is safe, predictable, and not scary.”
Step-by-Step: How to Train a Lovebird to Step Onto Your Finger
Now we move into the actual training process. Keep sessions short 5 to 10 minutes is enough.
Step 1: Get Your Lovebird Comfortable With Your Hand
Place your hand near the cage without touching anything inside.
Do this daily:
- Rest your hand on the outside of the cage
- Offer a treat through the bars
- Stay still and calm
If your bird panics or moves away, don’t chase or push further. Just pause and try again later.
Step 2: Introduce Your Hand Inside the Cage
Once your bird no longer reacts strongly to your hand outside the cage:
- Slowly place your hand inside the cage
- Keep it low and non-threatening
- Avoid sudden movement
- Do not attempt to touch the bird yet
At this stage, your bird may:
- Watch cautiously
- Move away slightly
- Show curiosity from a distance
All of these are normal.
Step 3: Offer Treats From Your Fingers
Now you begin forming positive association.
Hold a treat between your fingers:
- Let your lovebird approach voluntarily
- Do not force it toward the bird
- Reward even small steps of curiosity
This step can take a few sessions or a few days depending on temperament.
Step 4: Introduce the “Step Up” Cue
Once your bird is comfortable eating from your hand:
Use a consistent cue like:
- “Step up”
- “Up”
- Or any short phrase you prefer
Then:
- Place your finger gently near its lower chest
- Slightly press against its feet (very lightly)
- Encourage stepping, not grabbing
Most lovebirds will instinctively step up when balanced properly.
Step 5: Reward Immediately
The reward must be instant:
- Millet bite
- Praise in a calm voice
- Gentle head scratch (only if it allows)
Timing matters more than quantity.
Step 6: Practice Outside the Cage
Once your bird steps onto your finger inside the cage:
Try:
- Moving it just outside the cage
- Standing still with it on your hand
- Letting it step back onto a perch
This helps prevent “cage dependency.”
Emotional Side of Training (What Your Lovebird Feels)
This is often overlooked.
Your lovebird is not “learning a trick” the way dogs do. It is slowly deciding:
“Is this human part of my safe flock?”
During training, your bird may feel:
- Curiosity
- Hesitation
- Mild fear at first
- Comfort after repetition
If you notice progress slowing down, it usually means your bird needs:
- More time
- Less pressure
- Shorter sessions
Not more intensity.
5 Common Mistakes That Break Trust
Many owners unintentionally slow progress.
Avoid these mistakes:
1. Grabbing the bird
This instantly resets trust-building progress.
2. Training too long
Over 10–15 minutes can overwhelm your bird.
3. Inconsistent commands
Changing words confuses your bird.
4. Training when the bird is stressed
Avoid training if your bird is:
- Molting heavily
- Recently moved
- Loudly frightened
5. Forcing step-up
This leads to long-term avoidance of hands.
What Speeds Up Training Progress
Some small adjustments make a big difference:
Keep training consistent
Same time each day builds routine recognition.
Use high-value treats only for training
Not daily feeding treats.
Train in a quiet environment
Reduce distractions like TV or loud movement.
Watch body language closely
Look for:
- Relaxed feathers
- Curious head tilts
- Approaching behavior
These indicate readiness.
Beginner-Friendly Training Schedule
Here’s a simple weekly structure:
Days 1–3
- Hand outside cage
- Talking and calming presence
Days 4–6
- Hand inside cage
- Treat association
Days 7–10
- First step-up attempts
- Short, calm sessions
After Day 10
- Reinforce step-up
- Practice outside cage
Some birds progress faster; others take longer. Both are normal.
When Should You Worry?
Training should feel calm, not stressful. However, watch for signs that something is off:
- Constant biting without settling
- Extreme panic whenever you approach
- Refusing food even outside training sessions
- Sudden aggression changes
- Self-harming behavior like feather plucking
If these signs appear, pause training and evaluate:
- Cage environment
- Noise levels
- Possible illness
A check with an avian vet may be necessary if behavior changes suddenly.
What Should Pet Owners Do If Progress Is Slow?
Slow progress is extremely common with lovebirds. The best response is not more pressure it’s refinement.
Try this:
- Shorten sessions
- Move slower with hand introduction
- Increase treat value
- Rebuild trust for a few days
Sometimes the fastest progress comes after a short break.
Helpful Daily Care Checklist for Better Training
- Clean, stress-free cage environment
- Consistent feeding schedule
- At least 30–60 minutes of social interaction daily
- Fresh water always available
- Quiet sleep environment (important for behavior stability)
A relaxed bird learns faster.
Why Some Lovebirds Learn Faster Than Others
Every lovebird has a unique personality.
Faster learners often:
- Have early human exposure
- Are naturally curious
- Are younger birds
Slower learners may:
- Be older
- Have had limited handling
- Be more cautious by nature
Neither is a problem just a difference in pace.
Realistic Expectations (Very Important)
Many owners expect step-up training in one or two sessions. While that can happen, most birds need:
- 3–14 days for basic comfort
- 1–3 weeks for consistent finger stepping
- Longer for fully tame behavior
Progress is rarely linear. Some days feel like improvement, others feel like regression but it balances out.
Conclusion
Training a lovebird to sit on your finger is less about teaching a command and more about building trust step by step. When your bird feels safe, it will choose your hand willingly rather than out of fear or force.
Be patient with small progress. A single calm step-up is far more valuable than rushed repetition. Over time, your lovebird will begin to recognize your hand as a safe place rather than a threat and that’s where real bonding begins.
More Information About Pets, Please Visit Our Website: Petcalmly.com
Frequently Asked Questions
1. How long does it take to train a lovebird to sit on your finger?
It usually takes a few days to a few weeks depending on the bird’s personality and past handling. Consistency matters more than speed.
2. Why is my lovebird scared of my hand?
Your hand is a new object in its environment. Birds are naturally cautious, so fear is a normal early response that improves with trust.
3. Can older lovebirds still learn finger training?
Yes, older lovebirds can learn, but they may take longer because they are more set in their habits and behaviors.
4. What treats work best for training lovebirds?
Millet spray is usually the most effective. Small fruit pieces or favorite seed mixes also work well.
5. My lovebird bites when I try to train it what should I do?
Stop forcing interaction. Biting is often a sign of fear or discomfort. Return to trust-building steps and slow down the process.
6. Should I train my lovebird outside or inside the cage?
Start inside the cage where your bird feels safe, then gradually move to outside environments once it becomes comfortable stepping up.