
Short direct answer
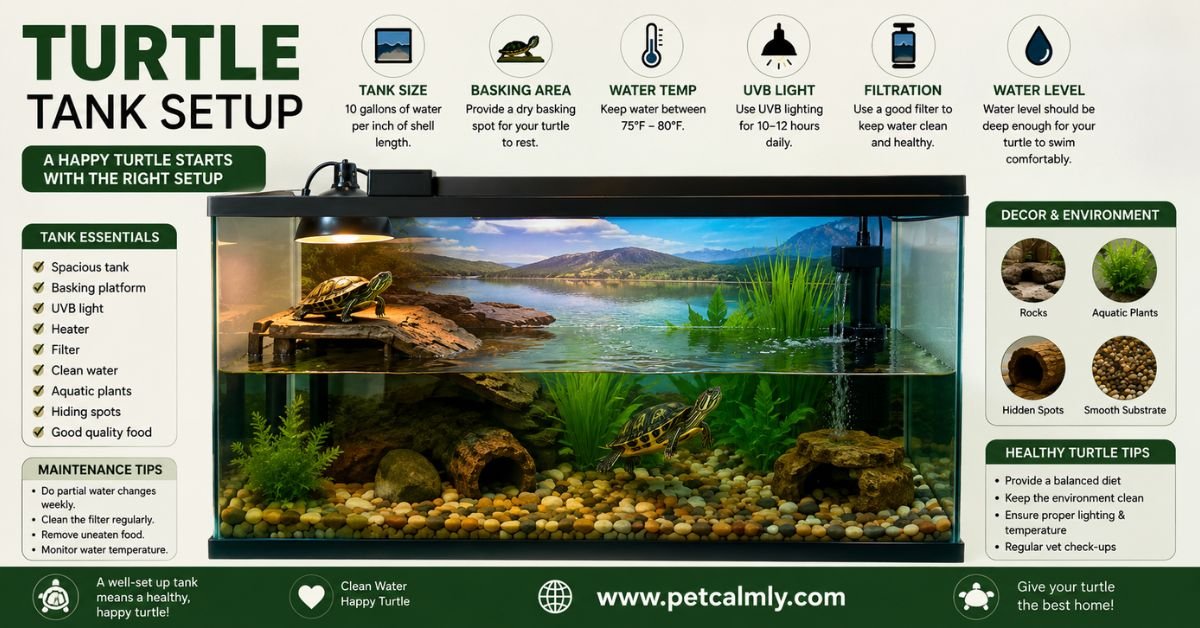
A proper turtle tank setup needs four things working together: a large enough enclosure (usually 20–75+ gallons depending on species), a basking area with a heat lamp and UVB light, a filtered water section deep enough forn swimming, and a substrate that’s easy to clean. Most freshwater turtles like red-eared sliders need at least 10 gallons of water per inch of shell length, plus a dry basking spot that reaches 90–95°F. Get these basics right, and everything else feeding, health, and behavior tends to fall into place.
If you’ve just brought home a turtle, or you’re rehoming one from a friend who “didn’t realize how big they get,” you’re probably feeling a mix of excitement and low-grade panic right now. That’s completely normal. Turtles are a lot more work than the sad little bowl setups sold at pet stores would have you believe, and most of the stress owners feel in the first few weeks comes from not knowing what “enough” actually looks like. This guide walks through it step by step, the way I’d explain it to a friend standing in their living room with an empty tank and a turtle in a bucket.
Why Turtle Tank Setup Trips Up So Many New Owners
Here’s the honest truth: turtles are often marketed as low-maintenance pets, but their care requirements are closer to a small aquarium and a reptile terrarium combined. You’re managing water quality, air temperature, basking heat, UV exposure, and diet all at once. Miss one piece, and you’ll often see it show up as a health problem months later soft shells, swollen eyes, or a turtle that just stops eating.
The good news is that once a tank is set up correctly, turtles are genuinely resilient, low-drama pets. The setup phase is the hard part. After that, it’s mostly maintenance.
Choosing the Right Tank Size for Your Turtle
Tank size is where most beginners underestimate. A hatchling red-eared slider might look adorable in a 10-gallon tank, but that same turtle can reach 8–10 inches in a few years, and it will need 75–100+ gallons by adulthood.
General Sizing Rule of Thumb
A widely used guideline among experienced keepers is 10 gallons of water per inch of shell length. So:
- A 4-inch turtle needs roughly 40 gallons
- A 6-inch turtle needs roughly 60 gallons
- A full-grown 10-inch slider needs 100 gallons or more
This applies mainly to aquatic species like sliders, painted turtles, and cooters. Box turtles and other semi-terrestrial species need floor space instead of water depth, since they’re land-dwellers that just need a shallow soaking dish.
Buy for the Adult Turtle, Not the Baby
This is the single most common mistake I see: people buy a “starter tank” for a baby turtle, then have to upgrade twice within two years. If your budget allows, it’s genuinely easier — and cheaper long-term — to set up the adult-sized tank from day one and let a smaller turtle grow into it. A young turtle in a big tank is not a problem; a grown turtle in a small tank is a welfare issue.
Water Setup: Depth, Filtration, and Quality
How Deep Should the Water Be?
Water depth should generally be about 1.5 to 2 times the turtle’s shell length, deep enough for comfortable swimming but shallow enough that the turtle can easily reach the surface to breathe. Very young turtles or weaker swimmers may need shallower water with easy access to land until they build strength.
Filtration Matters More Than People Expect
Turtles are messy. They eat and defecate in the same water they swim in, which means bacteria and ammonia can build up fast without proper filtration. A canister filter rated for at least double your tank’s actual volume is a smart baseline, since turtle tanks get dirtier much faster than fish-only aquariums.
Signs your filtration isn’t keeping up:
- Cloudy or green water within a day or two of cleaning
- A persistent smell (a healthy tank shouldn’t smell bad)
- Algae growing rapidly on the glass
Weekly Water Maintenance Checklist
- Test ammonia, nitrite, and pH weekly, especially in the first two months
- Do a partial water change (25–50%) weekly, even with a strong filter
- Wipe down the basking platform, since bacteria collects there too
- Rinse filter media in old tank water, not tap water, to preserve beneficial bacteria
Basking Area: The Part Owners Most Often Get Wrong
Turtles need to fully dry off and warm up outside the water every day. Without a proper basking spot, they’re at real risk of shell and skin infections, because damp shells that never get the chance to dry out create the perfect environment for fungus and bacteria to take hold.
What a Good Basking Spot Looks Like
- Large enough for the turtle to fully climb out of the water, not just perch with legs still wet
- A stable, non-slip surface a floating dock, rock ledge, or driftwood platform all work
- Positioned under a basking bulb, not just ambient room light
Temperature Targets
| Zone | Ideal Temperature |
|---|---|
| Basking spot (surface) | 90–95°F (32–35°C) |
| Water temperature | 75–80°F (24–27°C) |
| Room/ambient air | 75–80°F (24–27°C) |
Use an actual thermometer at turtle level, not a guess based on how the bulb “feels” from above. Heat lamps can run hotter or cooler than their wattage suggests depending on distance and airflow.
UVB Lighting: Not Optional, Even If It’s Invisible
This is the part that trips up more turtles’ health than almost anything else, because you can’t see whether it’s working. Turtles need UVB light to produce vitamin D3, which lets their bodies absorb calcium properly. Without it, turtles can develop metabolic bone disease, a condition that causes soft, deformed shells and weakened bones and it’s largely preventable with correct lighting.
A few practical points:
- Use a UVB bulb rated for reptiles (5.0 or 10.0 strength is common for turtles), not a generic aquarium light
- Replace UVB bulbs every 6–12 months even if they still light up, since UV output fades long before visible brightness does
- Keep the bulb roughly 10–12 inches from the basking spot, or per the manufacturer’s guidance, since glass and mesh screens can block UV differently
Substrate: Bare Bottom vs. Natural Setup
Substrate is one of the more debated choices among turtle keepers, and honestly, either approach can work well.
Bare bottom tanks (no substrate) are easier to keep clean and reduce the risk of a turtle swallowing gravel, which can cause impaction. This is the lower-maintenance, beginner-friendly option.
Natural substrate (large river rocks too big to swallow, or sand for species that like to dig) can look more attractive and mimic a wild habitat, but it takes more effort to keep clean and isn’t ideal for every species.
If you do use substrate, avoid small gravel or anything a turtle could accidentally ingest while feeding.
Setting Up the Tank Step by Step
- Choose and place the tank on a sturdy, level stand that can support the weight of water (roughly 8 lbs per gallon once full).
- Add substrate if you’re using it, then rinse it thoroughly first.
- Install the filter and position the intake/output for good water flow across the whole tank.
- Build the basking area using a platform, ramp, or floating dock the turtle can climb onto easily.
- Fill with dechlorinated water to the appropriate depth for your turtle’s size.
- Mount the basking lamp and UVB light above the dry area, checking temperatures with a thermometer.
- Cycle the tank for several days to a week before adding your turtle, if starting from scratch, so beneficial bacteria can establish.
- Add décor and hides driftwood, smooth rocks, or aquatic plants for enrichment and a sense of security.
- Test everything for 24–48 hours before introducing your turtle: temperatures, filtration flow, and that the basking area is fully dry.
5 Common Mistakes That Lead to Health Problems
- Tank too small for the turtle’s adult size — leads to stress, poor water quality, and stunted growth
- No UVB light, or an old bulb that’s stopped producing UV — a leading cause of metabolic bone disease
- Basking spot too cool or too far from the light — turtle can’t dry out or thermoregulate properly
- Overfeeding — excess food breaks down and fouls the water fast, compounding filtration problems
- Weak filtration for the tank size — leads to chronic poor water quality even with regular changes
When Should You Worry? Signs of a Setup Problem
Most day-to-day quirks are normal turtle behavior, but a few signs point to something in the setup or the turtle’s health that needs attention:
- Shell that looks soft, flaky, or has white/gray patches
- Turtle rarely or never basks, even when the spot is available
- Cloudy, red, or swollen eyes
- Turtle stops eating for more than a few days
- Visible mucus, bubbles from the nose, or labored breathing
These can be signs of shell infection, respiratory illness, or vitamin deficiency, and they generally call for a veterinarian who treats reptiles — not just a tank adjustment. Aquatic turtle health issues can progress quietly for weeks before becoming obvious, so it’s worth taking early changes seriously rather than waiting to see if they resolve on their own.
What Should Pet Owners Do Next?
If your tank is already set up and something feels off, start by checking the basics in this order: water temperature, basking temperature, UVB bulb age, and recent water quality test results. A surprising number of “mystery” turtle problems trace back to one of these four things drifting out of range without anyone noticing.
If you’re just starting out, resist the urge to add your turtle on day one. Give the tank a few days to stabilize temperature and, ideally, cycle the filter first. A little patience here saves a lot of stress later.
Conclusion
A good turtle tank setup isn’t about buying the fanciest equipment it’s about consistently meeting a few core needs: enough space to grow into, clean and appropriately deep water, a genuinely dry and warm basking spot, and real UVB light. Get those right, keep an eye on water quality, and check in on your turtle’s shell and behavior regularly, and you’ll have a setup that supports a healthy pet for decades, since many pet turtles live 20–40 years or longer. It’s a real commitment, but for most owners, watching a turtle settle comfortably into a well-built habitat makes the setup effort feel worth it fast.
More Information About Pets, Please Visit Our Website: How Often Should I Feed My Turtle?
How to Treat a Sick Turtle at Home Naturally
Red Eared Slider Care
Frequently Asked Questions
1: What size tank does a baby turtle need?
A baby aquatic turtle can start in a 20–29 gallon tank, but plan to upgrade as it grows most species need 75–100+ gallons by adulthood, so buying for the adult size from the start can save money and stress later.
2: Can I use tap water in a turtle tank?
Yes, but it needs to be treated with a dechlorinator first, since chlorine and chloramine in tap water can irritate a turtle’s skin, eyes, and shell.
3: Do turtles need a heat lamp and a UVB light, or just one?
Both. The heat lamp warms the basking area so the turtle can thermoregulate, while UVB light lets it produce vitamin D3 for calcium absorption they serve different purposes and neither one replaces the other.
4: How often should I clean a turtle tank?
Do a partial water change of 25–50% weekly, even with strong filtration, and a fuller deep clean every few weeks depending on tank size and turtle waste output.
5: Why does my turtle tank smell bad even after cleaning?
A persistent smell usually points to inadequate filtration for the tank’s bioload, overfeeding, or a water change that wasn’t thorough enough it’s rarely normal and is worth troubleshooting rather than ignoring.
6: Can two turtles share the same tank?
Sometimes, but it requires significantly more space per turtle, careful species matching, and close monitoring for aggression or competition over basking spots and food many keepers find single housing simpler and less stressful for the turtles.