Short direct answer
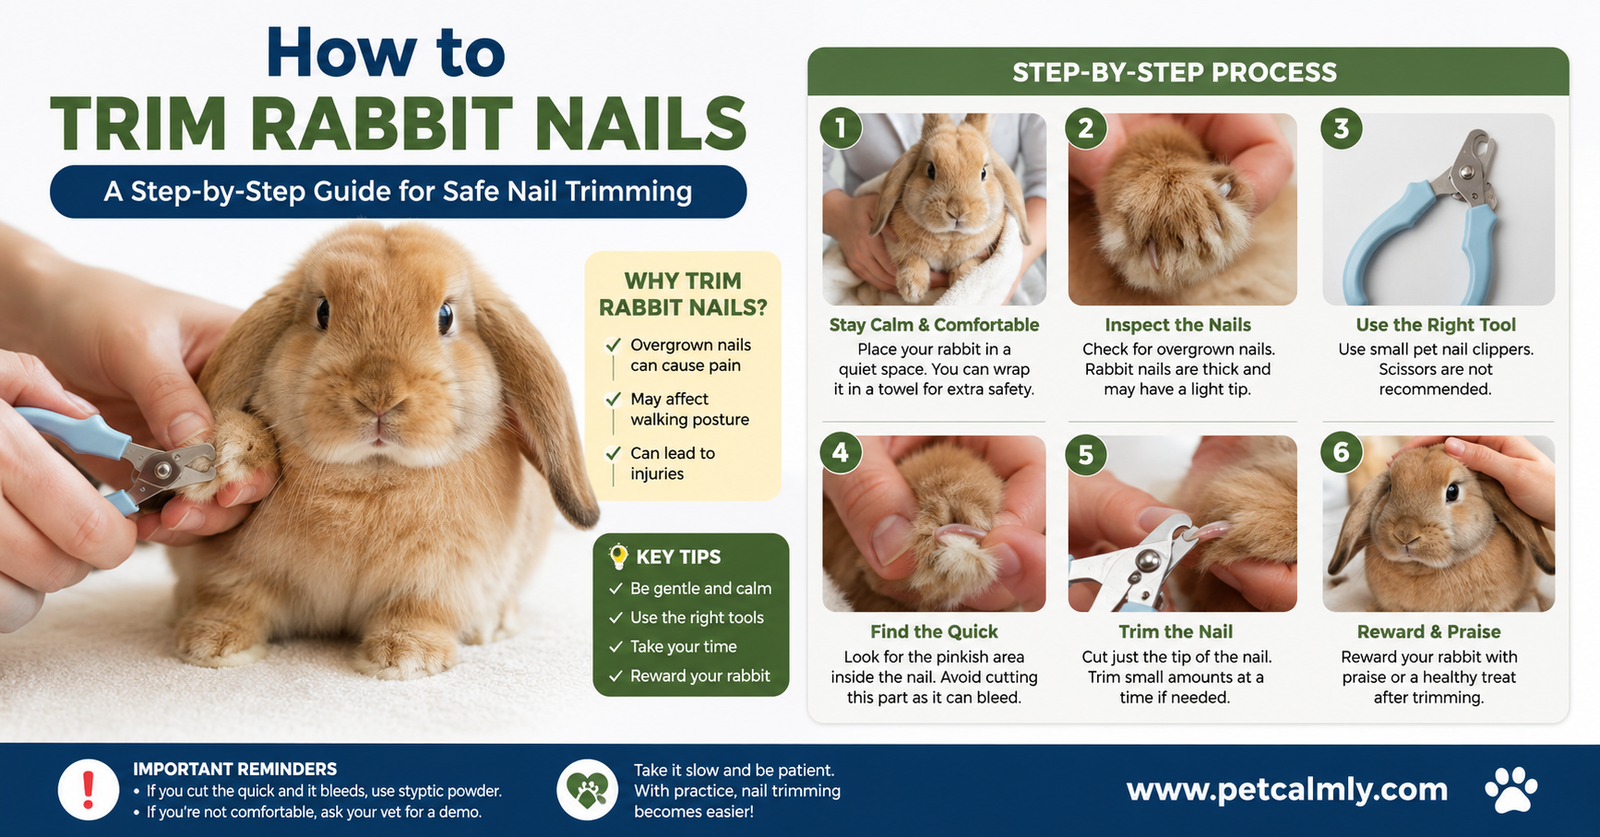
Trimming rabbit nails is a straightforward process that most owners can handle at home. Start by gently restraining your rabbit, locate the clear or light-colored part of the nail (avoiding the dark center vein), and clip just the tip using pet nail clippers designed for small animals. The whole process typically takes 15–30 minutes per rabbit, and most rabbits need their nails trimmed every 4–6 weeks. If your rabbit has dark nails where the vein isn’t visible, trim conservatively or ask your vet for guidance.
Why Rabbit Nail Trimming Matters
If you’ve ever heard your rabbit clicking across the kitchen floor or watched them struggle to grip surfaces smoothly, you’re witnessing the telltale sign of overgrown nails. Unlike wild rabbits that naturally wear their nails down through digging and running on rough terrain, domesticated rabbits living on soft bedding and flooring don’t get the same nail maintenance. This means nail trimming falls squarely on your shoulders but the good news is it’s entirely manageable.
Rabbit nail care isn’t just about comfort or those annoying clicking sounds on hard floors. Overgrown nails can curl back into the paw pad, cause limping, make jumping painful, and even lead to infections if left unchecked. Beyond that, longer nails make rabbits more likely to accidentally scratch themselves during grooming or while running around the house. It’s one of those quiet preventive care tasks that keeps your rabbit moving smoothly and living happily.
The goal of this guide is to walk you through the entire process from understanding when your rabbit needs a trim to handling the nail clippers with confidence. Whether this is your first time trimming nails or you’re looking to refine your technique, you’ll find practical, step-by-step guidance here.
How Often Do Rabbits Need Their Nails Trimmed?
Most rabbits benefit from a nail trim every 4–6 weeks. Some rabbits with faster-growing nails might need trims every 3–4 weeks, while others with slower growth might stretch to 6–8 weeks. The key is observing your individual rabbit rather than following a rigid schedule.
Your rabbit’s age, breed size, and lifestyle all influence nail growth. Larger breeds like Flemish Giants and angora rabbits tend to have thicker, faster-growing nails. Older rabbits sometimes have more brittle nails that wear differently. Indoor rabbits living on carpet or soft flooring wear their nails down less effectively than rabbits with supervised outdoor access or those living on tile or concrete.
A practical approach is to do a quick nail check every two weeks. If the nails are starting to curve noticeably or you’re hearing more clicking sounds on hard floors, it’s time for a trim. Once you’ve trimmed your rabbit’s nails a few times, you’ll develop an intuitive sense of the timing that works for your specific rabbit.
Signs Your Rabbit’s Nails Are Overdue for Trimming
It’s worth knowing what overgrown rabbit nails actually look like, especially if you’re new to rabbit ownership. Here are the most common signs:
Visual Signs You Can Spot:
- Nails that curve downward or hook noticeably
- Nails that appear to extend well beyond the toe pad
- Visible discoloration or debris under the nails
- A slight curl visible from the side profile of the paw
Behavioral Signs That Suggest Overgrowth:
- Clicking or clacking sounds when your rabbit walks on hard flooring
- Limping or reluctance to put weight on certain paws
- Changes in hopping style or reluctance to jump onto furniture
- Excessive foot chewing or licking (sometimes a sign of discomfort)
- Your rabbit seems to grip surfaces less effectively
- Reluctance to run or play as they normally would
Physical Signs to Check Directly:
- When you gently hold your rabbit’s paw, the nail curls noticeably
- The paw pad shows redness, irritation, or the nail has begun curving into the pad
- You notice your rabbit has been over-grooming their feet
If you’re seeing any of these signs, a trim is definitely overdue. The good news is that once you start regular trimming, your rabbit will be more comfortable and you’ll prevent the kinds of problems that come with severe overgrowth.
Tools You’ll Need to Trim Rabbit Nails Safely
Having the right tools makes the entire process smoother and safer for both you and your rabbit. Let’s break down what actually works:
Essential Nail Clippers for Rabbits:
The best choice for most rabbits is a small pet nail clipper, specifically the scissors-style or guillotine-style clippers designed for small animals. Avoid large dog or cat clippers, as they can be difficult to control and may crush or split the nail. Look for clippers labeled for small animals, rabbits, or birds these are appropriately sized and designed for the delicate work.
Two styles work well:
- Scissors-style clippers (also called straight-cut clippers) are intuitive to use and give you excellent visibility and control. They’re particularly helpful if this is your first time.
- Guillotine-style clippers have a small circular opening where you insert the nail, and a blade drops down to cut it. These work well once you’re comfortable with the technique, but the circular opening can make it harder to see exactly where you’re cutting.
Your best bet for starting out is scissors-style clippers. Popular options include the Safari Small Animal Claw Trimmer or similar brands available at pet stores.
Additional Tools That Make Trimming Easier:
- A styptic pen or styptic powder: This is your safety net. If you accidentally clip too short and the nail bleeds, styptic powder stops the bleeding within seconds. Cornstarch is a budget-friendly alternative if you don’t have styptic powder on hand.
- Good lighting: A clip-on lamp, headlamp, or even good natural window light helps you see the vein clearly, which is the most critical part of safe trimming.
- A towel or non-slip mat: This gives your rabbit something to grip and helps them feel secure during the process.
- Treats: Small, high-value treats help create positive associations with nail trimming and reward your rabbit for cooperation.
Tools to Avoid:
Don’t use human nail clippers, scissors, or large pet clippers. These don’t provide the precision and control you need, and they can crush or splinter rabbit nails rather than cutting them cleanly.
Step-by-Step Guide to Trimming Your Rabbit’s Nails
Now for the practical part. Here’s how to trim your rabbit’s nails safely and efficiently:
Step 1: Set Up Your Space and Prepare
Before you even bring out the clippers, create a calm environment. Choose a time when your rabbit is naturally relaxed—often later in the evening or after they’ve had a chance to play and burn energy. Dim, stressed rabbits are much more difficult to work with.
Gather all your tools within arm’s reach: clippers, styptic powder, treats, and good lighting. A sturdy table or your lap with a towel works fine as your work surface. Make sure you have adequate lighting so you can clearly see the nail and the vein inside it—this is non-negotiable for safe trimming.
Step 2: Calm and Position Your Rabbit
Approach your rabbit gently and bring them to your work area. If your rabbit tends to be anxious, offer a small treat first to create a positive association. Never chase or restrain your rabbit before trimming, as stress makes them more difficult to handle and increases the likelihood of injury if they struggle suddenly.
Position your rabbit so they’re sitting calmly on the towel or mat. You can do this with your rabbit on your lap, on a table, or even while they sit in a semi-upright position. The key is that your rabbit feels stable and secure, not like they’re going to slip or fall.
Some rabbits relax better if they’re gently swaddled in a towel that covers their eyes, which reduces visual stimulation and creates a calming effect. Others prefer to sit naturally without restraint. You’ll learn your rabbit’s preference quickly.
Step 3: Examine the Nail and Identify the Vein
Gently take one of your rabbit’s front paws in your hand and look closely at the nail. This is the most critical step. Rabbit nails typically have a lighter outer section and a darker center where the blood vessel (called the quick or vein) runs through. Your goal is to cut only the light outer part, stopping well before the dark center.
If your rabbit has light-colored nails, the vein is usually easy to spot it looks like a dark line running down the center of the nail. If your rabbit has dark nails, identifying the vein is harder. In dark nails, look for a small dark circle or oval in the center of the nail when you look at it head-on. This is the vein.
When in doubt, err on the side of caution. It’s better to trim less and need to do it again in a few weeks than to accidentally catch the vein and cause bleeding and pain.
Step 4: Position the Clippers Correctly
Hold the clippers so they’re perpendicular to the nail, not at an angle. Position them to cut just the curved, translucent tip—usually about 2–3 millimeters. The goal is to remove the pointy part while leaving plenty of the nail behind.
Use your non-dominant hand to gently hold the paw and keep the nail stable. Your dominant hand operates the clippers. Make sure you have a clear view of where you’re cutting before you commit to it.
Step 5: Make the Cut Smoothly and Confidently
Cut in one smooth, confident motion. Hesitant or slow cutting sometimes crushes the nail rather than cutting it cleanly. Once you’ve positioned the clippers correctly, press firmly and quickly. The nail should cut cleanly.
If you notice the nail has a small dark spot in the very center (the start of the vein), stop immediately. You’ve trimmed enough. Don’t try to trim further on that nail.
Step 6: Inspect and Move Forward
After you cut, glance at the tip you removed and the cut surface. If you see a tiny dark circle appearing in the center of the cut surface, you’re cutting close to the vein but as long as there’s no bleeding, you’re okay. If you see a drop of blood, that’s a sign you’ve nicked the vein, which we’ll address next.
Repeat this process for the remaining nails on that paw, then move to the next paw. Front paws typically need trimming more often than back paws, but check and trim all four paws while you’re at it.
Step 7: Handle Bleeding (If It Happens)
If you accidentally clip too short and see a small drop of blood, don’t panic—it happens to experienced rabbit owners too. Here’s what to do:
- Stop trimming immediately
- Dab the bleeding nail with styptic powder or cornstarch
- Hold it against the styptic for 20–30 seconds
- The bleeding should stop within a minute or two
- Let your rabbit rest and offer a treat as reassurance
- Resume trimming the remaining nails, being extra conservative with your cuts
A small amount of bleeding is not dangerous, though it’s uncomfortable for your rabbit. The key is preventing it through careful observation and conservative cutting. If bleeding doesn’t stop after a few minutes, contact your vet, though this is very rare.
Step 8: Reward and Release
Once you’ve finished all four paws, offer your rabbit their favorite treat and let them hop away. Keep the session positive so they’re willing to cooperate next time.
How to Calm an Anxious Rabbit During Nail Trimming
Some rabbits sit perfectly still for nail trims, while others act like you’re attempting something dangerous. This resistance is usually rooted in fear of the unknown, loss of control, or previous negative experiences not true misbehavior.
Before the Trimming Session:
Start building positive associations weeks before you actually trim nails. Handle your rabbit’s paws regularly during calm moments. Touch their nails gently, flip their paws, and reward them with treats. This desensitizes them to paw handling and makes the actual trim less shocking.
During the Trim:
Keep your voice calm and your movements deliberate. Anxious rabbits pick up on nervous energy from their owners. If you’re hesitant or tense, your rabbit will sense it and become more anxious. Take a breath, remind yourself this is routine, and proceed with confidence.
Work quickly but not rushed. Nervous handling leads to mistakes, so move efficiently without hurrying. The faster you can complete the trim safely, the better for an anxious rabbit.
If Your Rabbit Struggles:
If your rabbit begins thrashing or seems genuinely distressed, stop immediately and let them rest. Continuing through a panicked rabbit risks injury to both of you. Take a break of 10–15 minutes, offer treats and comfort, then try again with maybe one or two paws before stopping.
Some rabbits do better with two people one person handles and steadies the rabbit while the other trims. This can feel less chaotic for an anxious rabbit.
When Professional Help Is the Right Call:
If your rabbit is so anxious that trimming at home causes extreme stress, or if they’ve been injured during a previous trim and now panic at the sight of clippers, it’s completely reasonable to have your veterinarian or a professional groomer handle it. A single stress-free professional trim costs money but prevents your rabbit from developing a lasting negative association with nail care. Many rabbits become significantly less anxious once they realize the process isn’t actually painful.
7 Common Mistakes Rabbit Owners Make When Trimming Nails
Understanding common pitfalls helps you avoid them entirely:
Mistake 1: Using the Wrong Tools
Large dog clippers, human nail scissors, or dull tools can crush or splinter rabbit nails rather than cutting cleanly. This causes pain and sometimes bleeding. Small-animal-specific clippers are truly worth the investment.
Mistake 2: Trying to Trim Too Short
The most common mistake is cutting too aggressively in an attempt to “get it right.” Remember, you’re trimming every 4–6 weeks you don’t need to remove the entire nail at once. It’s far better to trim conservatively and trim more frequently than to risk cutting the vein.
Mistake 3: Waiting Too Long Between Trims
Some owners only trim when nails become severely overgrown. This makes trimming more uncomfortable for the rabbit (they’re more likely to struggle), and severely overgrown nails can cause actual damage to the paw pads. Regular 4–6 week trims prevent this problem entirely.
Mistake 4: Poor Lighting
You cannot safely trim rabbit nails in dim light. The vein is difficult to see even in good lighting, and poor visibility dramatically increases the risk of accidentally cutting it. Always set up proper lighting before you start.
Mistake 5: Lack of Restraint or Stability
A rabbit that feels like they’re going to slip or fall will thrash and struggle. Make sure your rabbit feels secure throughout the process. A towel, non-slip mat, or gentle but secure hold goes a long way toward keeping your rabbit calm.
Mistake 6: Ignoring Signs of Pain or Infection
If your rabbit limps after a trim, has redness or swelling around the nail area, or seems to be excessively licking their paws, contact your vet. This might indicate that a nail became infected or that a vein was nicked and caused a deeper issue.
Mistake 7: Trimming Dark Nails Without Confidence
If you can’t clearly see the vein in your rabbit’s dark nails, either ask your vet to show you the technique, have them trim the nails, or use a nail grinder designed for small animals instead of clippers. It’s better to ask for help than to guess on dark nails.
When to Ask Your Vet for Help with Rabbit Nail Trimming
There are specific situations where professional help is the right choice:
Consult Your Vet If:
- Your rabbit has a nail that appears infected, swollen, or discolored
- Your rabbit limps or shows signs of pain after a trim or has pain that doesn’t resolve within a day
- A nail has grown so severely that it’s curling into the paw pad
- Your rabbit has black nails and you’re uncomfortable identifying the vein
- Your rabbit’s nails appear unusually thick, brittle, or prone to splitting
- Your rabbit has pre-existing health conditions that make restraint risky (heart conditions, respiratory issues, etc.)
- You’ve accidentally cut into the vein and the bleeding won’t stop after a few minutes
- Your rabbit has a history of fighting or injuring themselves during handling, making home trimming unsafe
What to Expect at the Vet:
Your veterinarian can trim nails quickly and confidently. They may also identify underlying issues like fungal infections or claw disorders that need attention. Many vets are happy to show you the technique if you want to learn, or they can simply handle it for you if you prefer.
The cost is typically $10–30 per visit, depending on your location and veterinary practice. Some rabbit-savvy vets include nail trimming as part of an annual wellness check.
Alternative: Using a Nail Grinder Instead of Clippers
Some rabbit owners prefer using a small pet nail grinder (also called a Dremel tool, though many brands make similar products) instead of clippers. Grinders sand down the nail gradually rather than cutting it all at once.
Advantages of Nail Grinders:
- Very precise—virtually impossible to cut the vein since you’re not making one sudden cut
- Particularly helpful for rabbits with very dark nails where the vein is hard to see
- Creates a smooth edge with no sharp points
- Some anxious rabbits actually prefer the grinding sensation to the sound of clipper blades
Disadvantages:
- Takes longer than clipping (often 5–10 minutes per rabbit)
- The vibration and slight noise can startle some rabbits initially
- Requires patience to train your rabbit to tolerate the sensation
- Grinders cost more upfront ($20–50 for a small pet-specific model)
- Needs to be used carefully so you don’t overheat the nail
If You’re Interested in Trying a Grinder:
Start by letting your rabbit get used to the sound while it’s off. Then turn it on while holding your rabbit, letting them hear and feel the vibration without actually applying it to their nails. Gradually introduce it to the nails after several sessions. This slow introduction prevents anxiety and lets your rabbit understand that it’s not painful.
Maintaining Healthy Nails Between Trims
While regular trimming is the cornerstone of rabbit nail care, a few other practices support overall nail health:
Provide Surfaces That Naturally Wear Nails:
Rabbits that have access to rough flooring like concrete or tile wear their nails more than those on carpet. Indoor rabbits can benefit from a small concrete tile or brick placed in their play area. Some owners set up supervised outdoor time on grass, which also helps wear nails naturally (though this has other safety considerations).
Ensure Adequate Space for Running:
Rabbits that run and jump regularly wear their nails more effectively than sedentary rabbits. Regular exercise space—at least a few hours daily—supports not just nail health but overall wellness.
Observe Their Diet:
While nail health isn’t primarily about diet, rabbits with optimal nutrition tend to have stronger, healthier nails overall. A diet rich in hay, fresh greens, and appropriate pellets supports good health from the inside out.
Monitor for Signs of Underlying Issues:
Unusually brittle nails, excessive growth, or changes in nail texture sometimes indicate nutritional deficiencies, fungal infections, or other health concerns. If you notice these changes, mention them to your vet during your next visit.
Frequently Asked Questions
1: Can I just let my rabbit’s nails grow naturally?
A: Unlike wild rabbits that dig and run on rough terrain, domestic rabbits living on soft flooring and carpet don’t wear their nails down naturally. Letting them grow unchecked leads to discomfort, limping, curled nails that dig into paw pads, and potential infections. Regular trimming is essential for their comfort and mobility.
2: What if I’m really nervous about cutting the vein?
A: Many first-time rabbit owners feel nervous about this, and that’s completely understandable. Here’s the reality: if you trim conservatively (just removing the curved tip) and you have good lighting, the risk is very low. Start by watching a video or having your vet show you the technique. If you’re still uncomfortable, there’s absolutely no shame in having your vet trim the nails. As you watch or learn from your vet a few times, you’ll build confidence and may feel ready to try at home.
3: How do I know if I’ve cut too short?
A: If you see a tiny dark circle in the center of the cut nail surface, you’re cutting very close to the vein—but as long as there’s no bleeding, you’re technically safe. If you see a drop of blood, you’ve nicked the vein. Either way, apply styptic powder and stop trimming that nail. The next time you trim (in 4–6 weeks), you’ll have a better sense of how much nail your rabbit has and can adjust accordingly.
4: Do back paws need trimming as often as front paws?
A: Not usually. Front paws typically grow faster and need trimming every 4–6 weeks, while back paws sometimes can go 6–8 weeks. Check all four paws regularly and trim as needed, but don’t assume they all need trimming on the same schedule.
5: What’s the best way to hold my rabbit during trimming?
A: There’s no single “best” way since rabbits have different preferences. Some feel secure on their owner’s lap with a towel underneath. Others do better on a table at a comfortable working height. Some rabbits relax if you gently cover their eyes with a towel. Experiment to see what makes your rabbit feel most calm and secure. The key is that they feel stable and won’t slip or fall.
6: Is it normal for my rabbit to bleed a little after trimming?
A: A small drop of blood means you’ve nicked the vein, which is uncomfortable but not dangerous. Apply styptic powder immediately and the bleeding should stop within a minute or two. Avoid this in the future by trimming more conservatively. If bleeding continues for more than a few minutes, or if you see significant bleeding, contact your vet.
More Information About Pets, Please Visit Our Website: Rabbit Poop Normal vs Unhealthy
Can Rabbits Eat Lettuce?
How Much Does a Rabbit Vaccination Cost?
How to Calm a Scared Rabbit
Rabbit Safe Vegetables List
How to Pick Up a Rabbit Properly
Conclusion
Trimming your rabbit’s nails is one of those pet-care skills that feels intimidating at first but becomes straightforward with a little practice and the right approach. The key is understanding the anatomy of the nail, having appropriate tools, working with good lighting, and trimming conservatively. You’re not trying to remove the entire nail at once you’re maintaining your rabbit’s comfort and mobility through regular, gentle trims every 4–6 weeks.
Remember that every rabbit owner has accidentally nicked a vein at some point, and it’s not a disaster. Styptic powder is your safety net, and your rabbit will be fine. What matters is that you’re being proactive about your rabbit’s care and taking the time to learn the right technique.
If you’re feeling genuinely unsure or your rabbit is extremely anxious, having your vet handle it a few times is a perfectly reasonable choice. Many rabbit owners find that watching a professional or learning directly from their vet builds their confidence significantly. There’s no shame in starting there.
Your rabbit depends on you to keep their nails healthy and their paws comfortable. The good news is that this is entirely within your control. With these guidelines, a little patience, and regular practice, you’ll become proficient at nail trimming and your rabbit will benefit from better comfort, improved mobility, and fewer paw problems down the road.