Short direct answer
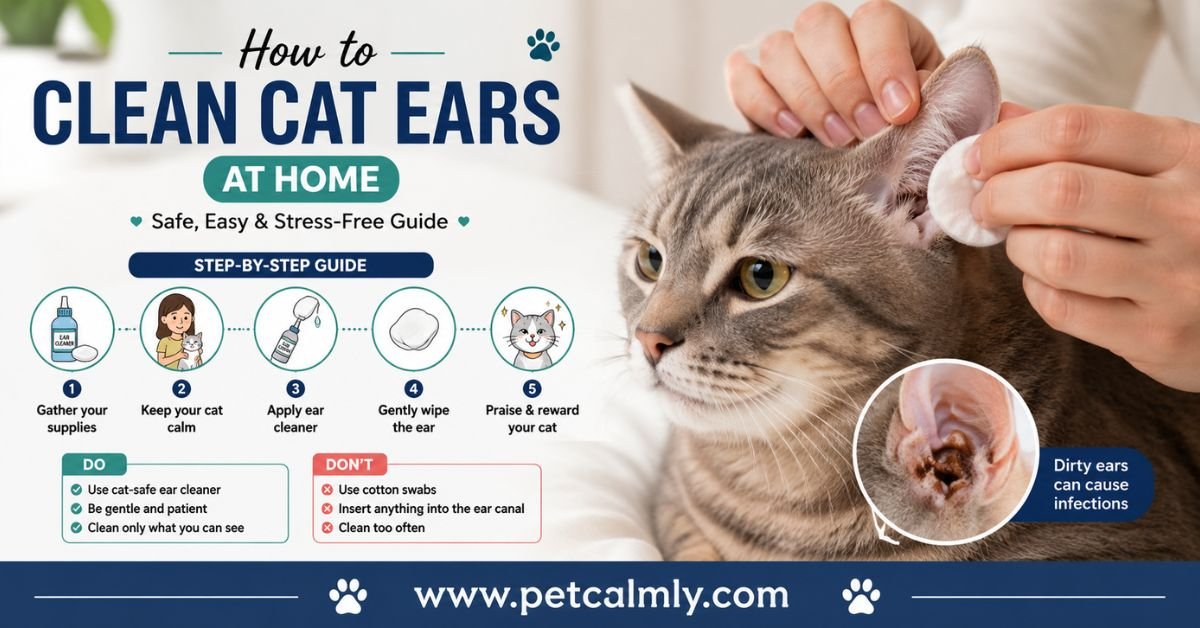
To clean cat ears at home, gently lift the ear flap, apply a vet-approved cat ear cleaner into the ear canal (not a cotton swab), massage the base of the ear for 10–15 seconds to loosen debris, then let your cat shake its head before wiping away the loosened wax with a cotton ball or soft gauze. Only clean the visible outer ear never insert anything into the ear canal itself. Most healthy cats only need this once every few weeks, and some don’t need it at all unless a vet recommends it.
If that sounds simpler than you expected, good that’s the point. Ear cleaning trips up a lot of cat owners not because it’s technically hard, but because cats hate having their ears touched, and one bad experience can make every future attempt feel like a wrestling match. This guide walks through the whole process the way an experienced cat owner would explain it to a friend: what to actually do, what to skip, and how to tell the difference between “a little wax” and “call the vet.”
Why Cat Ears Need Cleaning in the First Place
Cats are famously good groomers, but their self-cleaning doesn’t reach very far into the ear canal and it doesn’t do anything about wax buildup, environmental debris, or the kind of moisture that mites and yeast love to grow in. A small amount of light brown wax is completely normal. It’s the ear’s own way of trapping dust and pushing it toward the opening.
Problems start when that wax builds up faster than it clears out, or when something else is going on allergies, mites, excess moisture from bathing, or an ear infection that increases wax production or changes its texture and smell. That’s really the whole logic behind at-home ear cleaning: you’re not trying to deep-clean the ear canal yourself (that’s not safe, and it’s not the goal). You’re maintaining the visible, reachable part of the ear so problems don’t sneak up on you.
Some cats genuinely never need their ears cleaned. Short-haired, low-wax-producing cats with no history of ear issues might go their whole lives without it. Others particularly cats with allergies, outdoor access, or naturally waxier ears benefit from a light routine every few weeks. There’s no universal schedule, which is part of why so many owners feel unsure where to start.
Signs Your Cat’s Ears Actually Need Cleaning
Before reaching for cleaner, it helps to actually look. Gently fold the ear flap back in good light and check for:
- A thin layer of light brown or tan wax near the opening (normal)
- Visible dust, dirt, or debris around the outer ear (worth cleaning)
- A mild, faint odor with no discharge (usually still normal)
- Your cat shaking its head more than usual or scratching at one ear
What you’re not looking for and what should make you pause before cleaning is covered in the warning section further down. The short version: clean when there’s visible, manageable buildup. Don’t clean “just in case” every few days, since that can irritate healthy skin and actually cause the exact problem you’re trying to prevent.
What You’ll Need Before You Start
Gathering everything first matters more than it sounds like it should cats read hesitation, and fumbling around for supplies mid-clean is a fast way to lose their cooperation.
- A vet-approved feline ear cleaning solution (not water, not alcohol, not hydrogen peroxide)
- Cotton balls or soft gauze pads
- A towel (for wrapping a wiggly cat, if needed)
- Treats, for before and after
- A second pair of hands, if your cat is particularly squirmy
Skip cotton swabs entirely. It’s one of the most repeated mistakes in cat ear care, and for good reason swabs tend to push debris deeper into the canal rather than removing it, and they carry a real risk of injuring the eardrum if your cat moves suddenly. Everything you need to remove is at or near the visible opening; you don’t need to go further than that.
How to Clean Cat Ears at Home: Step-by-Step
This is the part most owners actually came here for, so here’s the process broken into stages that are easy to follow mid-task.
Step 1: Pick the Right Moment
Timing matters more than most people expect. Try cleaning your cat’s ears when they’re relaxed after a meal, during a lazy afternoon, or post-playtime when the initial burst of energy has worn off. Trying to clean ears during an already stressful moment (after a car ride, around unfamiliar guests) sets you both up for a harder time than necessary.
Step 2: Get Your Cat Comfortable and Secure
Hold your cat gently in your lap, facing away from you, with light but confident pressure. Wrapping a nervous cat loosely in a towel a “kitty burrito” can help if they tend to wriggle. The goal isn’t to restrain them tightly; it’s to create enough stillness that the process takes seconds, not minutes.
Step 3: Inspect the Ear First
Fold the ear flap back and look inside. This takes two seconds and tells you whether you’re dealing with normal light wax or something that needs a vet’s attention instead of a cleaning session.
Step 4: Apply the Ear Cleaner
Fill the ear canal with a few drops of cleaner, following the amount recommended on the product label. Don’t insert the applicator tip deep into the ear just above the opening is enough. Most cats will immediately want to shake their head; that’s expected and helpful.
Step 5: Massage the Base of the Ear
Gently massage the base of the ear (the part below the canal opening, where it meets the skull) for about 10–15 seconds. You’ll likely hear a soft squelching sound that’s the cleaner breaking up wax and debris inside the canal, and it’s completely normal, even if it sounds a little alarming the first time.
Step 6: Let Your Cat Shake
Step back and let your cat shake their head. This naturally brings loosened debris up and out of the canal toward the visible part of the ear, which is exactly where you want it before the next step.
Step 7: Wipe Away the Debris
Using a cotton ball or gauze wrapped around your finger, gently wipe the visible folds and opening of the ear. Never push into the canal you’re cleaning what you can see and reach, nothing more. Use a fresh cotton ball for the second ear to avoid transferring debris or infection between them.
Step 8: Reward and Release
End on a positive note every time a treat, some praise, a few minutes of play. This is genuinely one of the most effective long-term strategies for making future cleanings easier, because you’re building an association that outlasts any single session.
Common Mistakes That Make Ear Cleaning Harder Than It Needs to Be
A lot of the friction owners run into isn’t really about the cat it’s about small habits that make each session more stressful than it needs to be.
- Using cotton swabs inside the canal. This is the single most common mistake, and the one with the most risk attached.
- Cleaning too often. Daily or every-other-day cleaning on healthy ears can strip natural protective oils and irritate the skin.
- Using the wrong products. Water, vinegar solutions, alcohol, or hydrogen peroxide can sting, dry out the ear canal, or disrupt its natural pH.
- Restraining too tightly. Cats associate rough handling with danger, which makes every future attempt harder.
- Skipping the “look first” step. Cleaning over an infection can mask symptoms and delay treatment.
- Stopping mid-clean when the cat resists. This can accidentally teach your cat that resistance ends the process, making future sessions more difficult, not less.
A Quick Look at Cat Ear Anatomy (Why Technique Matters)
Understanding the basic shape of a cat’s ear makes the “why” behind these steps click into place. A cat’s ear canal isn’t a straight tube it bends at an L-shape, running vertically down from the visible opening before turning horizontally toward the eardrum. This bend is actually protective; it’s part of why gentle cleaning of the visible portion is usually enough, and why pushing anything further in is both unnecessary and risky.
Because of that curve, cleaner poured into the ear doesn’t have a direct path to the eardrum the way it might in a straighter canal. That’s also why the massage step matters so much it’s working the solution through the vertical section, breaking up debris along the way, rather than relying on gravity alone.
Knowing this can also ease some of the anxiety around the process. The squelching sound during massage isn’t cleaner “getting somewhere dangerous” it’s doing exactly what it’s supposed to do, safely contained within the outer portion of the canal.
Choosing the Right Ear Cleaner: What to Look For
Not all ear cleaners are created equal, and reading a label for two minutes before buying can save a lot of frustration later. A good feline ear cleaner typically:
- Is specifically labeled for cats (dog formulas aren’t automatically safe for feline skin)
- Uses a gentle, non-irritating base rather than harsh drying agents
- Comes with a soft applicator tip that doesn’t require deep insertion
- Lists ingredients your vet recognizes and approves of
If your cat has a known skin sensitivity or a history of allergies, it’s worth running any new product by your vet before the first use, even if it’s labeled “gentle” or “natural.” Marketing language on packaging isn’t a substitute for a professional opinion, especially for cats prone to reactions.
Some owners assume a stronger-smelling or medicated cleaner works better. In practice, medicated cleaners (the kind containing anti-yeast or anti-bacterial ingredients) are usually meant for cats already diagnosed with an issue, under a vet’s guidance — not for routine maintenance on healthy ears. Using a treatment-grade product as a everyday cleaner can be more irritating than helpful.
Breed and Age Considerations
Ear care isn’t identical across every cat, and a few common variables are worth knowing:
Cats with folded or unusually shaped ears (such as Scottish Folds) can have narrower canals that trap wax and moisture more easily, which sometimes means slightly more frequent monitoring though the cleaning technique itself doesn’t change.
Long-haired breeds like Persians or Maine Coons often have more hair growing near the ear opening, which can trap debris and moisture. Some owners gently trim this hair (with vet guidance) to make regular cleaning easier and reduce buildup.
Senior cats may groom themselves less thoroughly due to arthritis or reduced flexibility, which can mean slightly more wax accumulation than they had as younger cats. This is a good reason to keep an eye on their ears even if they never needed help before.
Kittens have smaller, more delicate ear canals and typically don’t need routine cleaning unless a vet identifies a specific issue. When in doubt with a young kitten, ask a vet to check first rather than starting a cleaning routine on your own.
Common Myths About Cat Ear Cleaning
A few persistent myths are worth clearing up, since they tend to shape (and sometimes worsen) how people approach this task:
Myth: Clean ears mean healthy ears, so cleaning more often is always better. In reality, over-cleaning can strip protective oils and irritate the skin, which sometimes leads to more wax production, not less, as the ear tries to compensate.
Myth: If my cat resists, something must be wrong. Most cats resist ear handling simply because it’s an unfamiliar sensation, not because it hurts. Genuine pain usually comes with other signs flinching sharply, vocalizing, or pulling away aggressively at the slightest touch, not just general wiggling.
Myth: A little bit of odor always means infection. Healthy ears can have a very faint, natural scent. It’s a strong, sour, or yeasty smell especially paired with discharge or redness that signals a problem worth checking.
Myth: Home remedies like apple cider vinegar are a safe alternative to commercial cleaners. Diluted vinegar and other DIY solutions can disrupt the ear’s natural pH or sting broken or irritated skin, and they lack the tested safety profile of a purpose-made feline ear cleaner.
How Often Should You Clean a Cat’s Ears?
There’s no single right answer here, and any article that gives you a strict weekly number is guessing. As a general guide:
| Cat Type | Suggested Frequency |
|---|---|
| Low-wax, indoor, no history of issues | As needed, or not at all |
| Average cat, mild regular wax | Every 3–4 weeks |
| Allergy-prone or outdoor cats | Every 1–2 weeks, or as your vet recommends |
| Cats recovering from an ear infection | Follow your vet’s specific instructions |
If you’re not sure which category your cat falls into, a quick check-in with your vet during a routine visit is the easiest way to get a personalized answer instead of guessing.
When Should You Worry? Signs of a Real Ear Problem
This is the part that matters most, so it’s worth being direct: general at-home cleaning is for maintenance, not treatment. If you notice any of the following, it’s time to see a veterinarian rather than reach for the cleaner:
- Dark brown, black, or coffee-ground-like discharge (a common sign of ear mites)
- A strong, unpleasant, or yeasty odor
- Redness, swelling, or visible irritation inside the ear
- Your cat scratching persistently, shaking their head repeatedly, or tilting their head to one side
- Sensitivity or pain when the ear is touched
- Discharge that’s yellow, green, or bloody
- Visible scabbing or hair loss around the ear
According to Cornell University College of Veterinary Medicine and VCA Animal Hospitals resources on feline ear health, these signs are commonly associated with ear mites, bacterial or yeast infections, or allergic reactions — all of which need a proper diagnosis rather than at-home treatment, since the wrong cleaner or approach can make certain infections worse. A vet can look inside the canal with an otoscope, check for mites under a microscope if needed, and prescribe the right treatment rather than leaving you to guess.
What Pet Owners Should Actually Do
If you’re staring at your cat right now trying to decide whether to clean their ears today, here’s a simple way to think it through:
- Look first. No discharge, no odor, no signs of pain proceed with a normal cleaning if there’s visible wax.
- See anything on the warning list above? Skip the home cleaning and book a vet visit instead.
- Not sure? A quick photo of the ear and a call to your vet’s office is a low-effort way to get peace of mind.
- First time doing this? Ask your vet to demonstrate once during a regular appointment. Watching it done correctly one time makes every future attempt easier.
There’s no prize for pushing through resistance or fear on your own. If your cat becomes distressed, or you’re not confident about what you’re seeing inside the ear, professional guidance is always the safer route.
A Realistic Example: What This Looks Like in Practice
Picture a cat who’s mildly food-motivated but not thrilled about handling. A workable routine might look like: five minutes after dinner, one ear checked and cleaned if needed, a treat, a short break, then the second ear. Some cats tolerate both ears back-to-back without issue; others do better with a pause in between. There’s no rulebook that fits every cat the process above is a framework, and small adjustments based on your own cat’s tolerance are completely normal and expected.
Conclusion
Cleaning a cat’s ears at home isn’t complicated once you know the actual steps inspect, apply cleaner, massage, let them shake, wipe the visible area, and stop there. The parts that trip people up are usually about mistakes (cotton swabs, over-cleaning, harsh products) rather than the core technique itself. Pay attention to what’s normal for your cat, watch for the signs that call for a vet instead of a cleaner, and keep sessions short, calm, and reward-based. Over time, most cats settle into the routine far more easily than their first reaction might suggest.
More Information About Pets, Please Visit Our Website: How to Bathe a Cat Safely at Home
Best Food for Persian Cats
Can Cats Drink Milk Safely Veterinary Advice
Best Homemade Food for Kittens
Cat Sleeping Positions Meaning
Why Is My Cat Drooling So Much?
Do Cats Remember Their Siblings When They Die?
What Are the Signs of Dehydration in Cats: Key Warning Signs ?
Do Cats Need More Food in Winter?
Why Does My Cat Lick My Nose So Much?
How Long Do Cats Mourn the Loss of Another Cat?
Why Does My Cat Run Away From Me When I Walk By
Why Does My Cat Keep Checking on Me at Night?
Why Does My Cat Stare at Me While I Sleep?”
Frequently Asked Questions
1: Can I use a cotton swab to clean my cat’s ears?
No. Cotton swabs can push wax and debris deeper into the ear canal and risk injuring the eardrum if your cat moves. Stick to cotton balls or gauze for the visible outer ear only.
2: What can I use at home to clean my cat’s ears if I don’t have cat ear cleaner?
It’s best to wait and use a vet-approved feline ear cleaning solution rather than substituting household items. Water, alcohol, vinegar, and hydrogen peroxide can irritate the ear or disrupt its natural balance.
3: How do I know if my cat has ear mites or just normal wax?
Normal wax is usually light brown and minimal. Ear mites typically produce dark, coffee-ground-like debris, often paired with intense itching and head shaking. A vet can confirm mites with a quick microscope check.
4: Is it normal for my cat to shake its head during ear cleaning?
Yes, this is expected and actually helpful it brings loosened debris up and out of the ear canal, making it easier to wipe away in the final step.
5: Why does my cat hate having its ears cleaned?
Ears are sensitive, and cats can associate the sensation or a past uncomfortable experience with stress. Going slowly, using treats, and keeping sessions brief can gradually build tolerance over time.
6: Should kittens’ ears be cleaned the same way as adult cats?
The technique is similar, but kittens have smaller, more delicate ear canals. Use less cleaner, be extra gentle, and check with your vet before starting a routine if your kitten is very young.